Table of Contents
What we are building
In this post, we will build a demo GraphQL API with all CRUD operations. Our purpose here is to implement the concepts in GraphQL. If you are new to this post, you should first be familiar with concepts in GraphQL by reading these two posts.
I also highly recommend you be familiar with GraphQL query language.
Our App is a simple book catalog that keeps records of authors and books written by them. There is a one-to-many relationship between these two entities as one author can write many books. to keep things simple, I will assume that one particular book can only be written by one author.
As mentioned before, this demo app will have all the CRUD (Create, Read, Update, and Delete ) functionalities. When deleting an author, this app will also delete the books written by the particular author( similar to cascade deletion in the Relational Database model ). This ensures that there will be no garbage records in our database.
I will be using the following project structure in this demo application.
- server/
  - graphql/
    - typeDefs.js (GraphQL schema definition)
    - resolvers.js (GraphQL resolver functions)
  - models/
    - Author.js (Mongoose schema for Author )
    - Book.js (Mongoose schema for Book )
- index.js (Node.js server configuration and Database connections )
- node_modules/
- package.json
Setting up MongoDB on Cloud
We are going to use MongoDB as our database. The following video shows how to set up and deploy MongoDB on the AWS cloud.
Setting up the GraphQL server and connecting to Database
I assume that you have already installed Node.js in your system. If it is:
- Create a new project directory and navigate into it.
- Initialize a new Node.js project using npm init or yarn init.
- Install the necessary dependencies:
npm install @apollo/server graphql mongoose dotenv nodemon@apollo/serveris a GraphQL server implementation that makes it easy to build and deploy GraphQL APIs.graphqlis the GraphQL language definition and runtime.mongooseis a MongoDB object modeling library for Node.js.dotenvis a Node.js module that loads environment variables from a.envfile.nodemonis a tool that automatically restarts your Node.js application when you make changes to the code.
- Create a new file named index.js (or any preferred name) in the project directory.
- Now, open your project folder in a text editor. We will be using ES Modules in setting up the project. so, you need to modify the package.json file.
- add
"type":"module"to the package.json file.
- add
- Import the required dependencies in the index.js file.
import { ApolloServer } from '@apollo/server';
import { startStandaloneServer } from '@apollo/server/standalone';
import dotenv from 'dotenv';
import mongoose from 'mongoose';
7. Create a .env file in the root folder, and add your MongoDB connection string. If you want you may also add the PORT variable that we are going to use later.
URL=mongodb+srv://tecforfun:[email protected]/library?retryWrites=true&w=majority
PORT=4000
8. After that add the following code in the index.js file.
dotenv.config();
const connection_url = process.env.URL;
dotenv.config() read the contents of the .env file, parses it, and sets the values as environment variables in the current Node.js process allowing you to access those variables within your application using process.env.VARIABLE_NAME, where VARIABLE_NAME is the name of the environment variable.
9. Now, you can connect your application to Mongo DB and start the Apollo server. If you did everything correctly, now it’s time to connect your application to the MongoDB database. We are using Mongoose connect method to do this job for us. Add the following code snippet.
mongoose.connect( connection_url,{
     useNewUrlParser: true,   //to avoid warnings
     useUnifiedTopology: true
}).then( ()=>console.log( "connected to DB"));
Add Schemas and resolvers
- We need GraphQL schemas and reolveers to start the GraphQL server.
- Create a folder named
graphqlin your root folder - Now create
typeDefs.jsinside this folder. - Add the following sample code for the moment. ( we will be replacing these later )
- Create a folder named
export const typeDefs = `
type Query {
  msg:String
}`;
11. Create another file name resolvers.js inside the same folder, then add the following sample code. ( we will be replacing these later )
export const resolvers = {
    // Define resolvers for queries
    Query: {
     msg:() => "hello World"
    // Define resolvers for Author type fields
    }
}
12. Import these files to index.js by adding the following import statements, and the code below to configure the Apollo server.
import { typeDefs } from './graphql/typeDef.js';
import { resolvers } from './graphql/resolvers.js';

const server = new ApolloServer({
  typeDefs,
  resolvers,
});
13. The next step is to start the Apollo server
const { url } = await startStandaloneServer(server, {
  listen: { port: process.env.PORT },
});


console.log(`Server starts at: ${url}`);
If you have done all these steps, you should have the following index.js file.
import { ApolloServer } from '@apollo/server';
import { startStandaloneServer } from '@apollo/server/standalone';
import { typeDefs } from './graphql/typeDef.js';
import { resolvers } from './graphql/resolvers.js';
import dotenv from 'dotenv';
import mongoose from 'mongoose';


// The ApolloServer constructor takes two parameters: the schema and the resolvers you created
const server = new ApolloServer({
  typeDefs,
  resolvers,
});

dotenv.config();
const connection_url = process.env.URL;

mongoose.connect( connection_url,{
     useNewUrlParser: true,   //to avoid warinings
     useUnifiedTopology: true
}).then( ()=>console.log( "connected to DB"));


// Passing an ApolloServer instance to the `startStandaloneServer` function.
// start the server at port 4000 on localhost
const { url } = await startStandaloneServer(server, {
  listen: { port: process.env.PORT },
});

console.log(`Server starts at: ${url}`);
Adding Mongoose Models
Mongoose is an Object-Data Modeling (ODM) library that provides a straightforward way to interact with MongoDB databases. It achieves this by allowing you to define schemas that match the structure of MongoDB objects (documents).
These schemas define the fields, data types, and validation rules for the data stored in MongoDB, providing a structured and organized approach to working with the database.
So, let’s create schemas for our entities: Author and Book.
- Create a folder named models in your root directory
- Then add Author.js to this folder.
- Add the following code:
import mongoose from "mongoose";

const AuthorSchema = mongoose.Schema({
    name:String,
    age: Number,
});

const Author = mongoose.model( 'Author', AuthorSchema );
export default Author;
The id the field( _id ) will be generated atomically by Mongoose. Therefore we do not need to enter it in the schema.
4. Create another file called Book.js in the same folder, and the following code:
import mongoose, { Schema } from "mongoose";

export const BookSchema = new mongoose.Schema({
    title: String,
    authorId:{
        type: Schema.Types.ObjectId,
        ref:'Author',
        required:true
    }
})

export default mongoose.model( 'Book', BookSchema );
As mentioned before, there is a one-to-many relationship between these two entities. authorId will hold the _id generated by Mongoose for the Author object.
Creating Schema Definition( Type definitions )
When we set up our server, we created typeDefs.js in the graphql folder. Now, it’s time to create the actual GraphQL schemas.
Replace the sample code you added before on typeDefs.js with the following code.
export const typeDefs = `
type Author {
  id: ID!
  name: String! # returns a String and non-nullable
  books(limit: Int = 3 ): [Book!]!# A list of Books
  age:Int
}

type Book {
  id: ID!
  title: String!
  #publicationDate: String
  authorId:ID!
}

type Query {
  authors: [Author!]!
}
`
We have now a schema definition for Author and Book Object types, and for Query. You are going to expand this definition as you follow this tutorial.
Adding Resolvers
We must create revolvers for the schemas we added above. Replace the sample code in resolvers.js you added before with the following code. We are using the find() method of Mongoose to fetch the data from MongoDB. In other words, this is the Read operation of our API. We are implementing only one read operation here. I will keep other read operations for you to implement as an exercise at the end of this post.
import Author from '../models/Author.js' //importing the Author model/schema

// Resolvers define how to fetch the types defined in your schema.
export const resolvers = {
    // Define resolvers for queries
    Query: {
      authors: async () => await Author.find({}),
    }
}
You can test this code by running the following query in the Apollo GraphQL UI. Although at the moment, there are no records on the author, this query will create an empty document ( similar to a table in relational Databases ) in MongoDB and send you the response.
| Query | Response |
|---|---|
query{ | { |
Adding Mutations
Create operation
We can not test run any useful queries without any data in our database. So, let’s add some data to our database. For this, we need to implement the create operation of the application.
Modify your Schema in the `typeDefs.js file by adding the following Mutation type.
type Mutation {
  createAuthor(name: String!, age: Int): Author!
}
What is the resolver for this mutation?
We are going to use the methods in Mongoose in implementing the resolver function. Add the new resolver function for mutations as below.
import Author from '../models/Author.js'

// Resolvers define how to fetch the types defined in your schema.

export const resolvers = {
    // Define resolvers for queries

    Query: {
      authors: async () => await Author.find({}),
    },

    //resolver for mutations
    Mutation: {
      createAuthor: async (parent, args) => {
         const newAuthor = new Author( args );
         return await newAuthor.save();
      }
    }
}
When a user passes data on an author from the front end, it will pass to the args object. Then, the save() method is used to write to the database. The “save()” method returns a promise and we are returning it to the front end.
you can run this mutation in the front end as below:
mutation CreateAuthor($name: String!, $age:Int ) {
  createAuthor(name: $name, age:$age ) {
    name
    age
  }
}
The JSON object that you need to use in the GraphQL UI
{
"name": "John",
"age":44
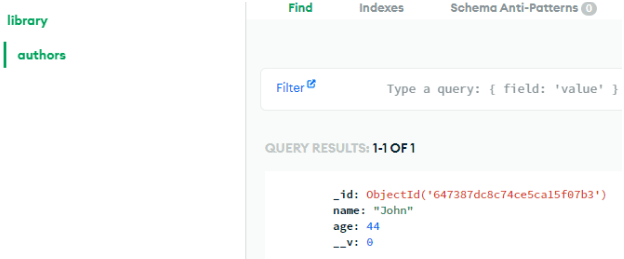
}If it executes correctly, your MongoDB database should have the following data.
Update operation
For Updating the author records, I am using the findByIdAndUpdate() and findById() methods of Mongoose. You can the following resolver after createAuthor resolver.
updateAuthor : async (parent, args ) => {
        const { id, name , age } = args;
        await Author.findByIdAndUpdate( id, { name ,age } );
        return await Author.findById( id );
}
Then run the following mutation in the Apollo GraphQL UI
mutation UpdateAuthor($id: ID!,$name:String!, $age:Int ) {
  updateAuthor(id: $id, name:$name, age:$age) {
    name
    age
  }
}
The JSON object that you need to use in the GraphQL UI. You can get the value for the id from the MongoDB document or by running a query on the GraphQL UI.
{
  "id": "647387dc8c74ce5ca15f07b3",
  "name": "Ryan",
  "age": 54,
}
Delete operation
In this post, I want to create the delete operation so that when I delete a record of an author it should be the relevant records books. this is similar to cascade deletion in the relational database model.
Because we need some records on books, first, let’s create a Mutation type to add books to our database. Therefore, add createBook(title: String!, authorId:ID! ):Book! to your type Mutation on the GraphQL schema definition.
type Mutation {
  createAuthor(name: String!, age: Int): Author!
  updateAuthor(id: ID!, name: String, age: Int): Author!

  createBook(title: String!, authorId:ID! ):Book!
}
Now, we need to implement the resolver for this mutation
First, add the following import the Book Molde as below to resolvers.js
import Book from '../models/Book.js';Then, add the following resolver function.
createBook: async ( parent, args ) => {
        const newBook = new Book( args );
        newBook.authorId = args.authorId;
        return await newBook.save();
}
Run the following mutation on GraphQL UI.
mutation CreateBook($title: String!, $authorId: ID!) {
  createBook(title: $title, authorId: $authorId) {
    title
    authorId
  }
}
JSON object with the values for variables in the mutation.
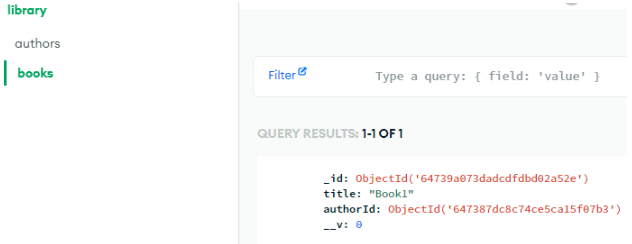
{
  "authorId": "647387dc8c74ce5ca15f07b3",
  "title": "Book1"
}
Now, if you check your database, you should have a record of the author and the book he has written.
Now time to implement the delete operation for the author. Add the following mutation to your mutation list.
type Mutation {
  createAuthor(name: String!, age: Int): Author!
  updateAuthor(id: ID!, name: String, age: Int): Author!
  deleteAuthor(id: ID!): Author!

  createBook(title: String!, authorId:ID! ):Book!
}
Now, add the resolver.
 deleteAuthor:async ( parent, args ) =>{
        const deletedAuthor = Author.findByIdAndRemove( args.id );
        await Book.deleteMany({ "authorId": args.id });
        return deletedAuthor;
}
In this function, we use findByIdAndRemove() method to find and remove the older record from the database. Then we use the deleteMany() Method to find the books written in that particular order and to delete those books. so we use it to remove garbage records from our database. but the main functionality of this function is to remove the record of the author. therefore we are returning the deleted author to the front end so that the user knows the operation is succeeded.
Let’s Test the deleteAuthor resolver by running the following mutation:
mutation DeleteAuthor( $id: ID!) {
  deleteAuthor(id: $id )
}
JSON object with the values for variables in the query.
{
  "id": "647387dc8c74ce5ca15f07b3",
}
Check your database. If you run it successfully, you should not have the records for the author and books associated with the author.
An exercise for you
I have shown you how to write the schema for Author and Book type. We have also learned the CRUD operation on the Author object. Now, I would like you to try the Read, Update, and Delete operations on the Book object.
Wrapping Up
I hope implementing this demo app helps you understand how graphQL helps in implementing CRUD operations. You can also add your own queries and experiment with this app.