Table of Contents
What are WebSockets?
WebSockets enable real-time, bidirectional (full-duplex) communication between clients and the server over a single, long-lived TCP connection.
What does it mean by ”real-time, bidirectional( full-duplex ) communication”? This means data can be transmitted in both ways on a transmission medium between the transmitter and the receiver at the same time.
And now you might wonder why I call WebSocket enables over single, long-lived connection. Because WebSockets is used for real-time communication, it is crucial to establish a Stateful ( in contrast to stateless as in HTTP ) uninterrupted connection between the client and the server.
WebSockets VS HTTP
To better understand WebSockets, let’s compare it with the more common HTTP ( Hypertext Transfer Protocol ) which is used to transfer hypertext documents over the internet.
| Aspect | WebSocket | HTTP |
|---|---|---|
| Communication | Bidirectional: Both client and server can send and receive data simultaneously. | A single connection serves multiple exchanges. |
| Connection | Persistent and long-lived connection. | Short-lived connection; new connection per request. |
| State | Stateful: Maintains a continuous connection state. | Stateless: Each request is independent. |
| Latency | Low latency: Immediate communication for real-time applications. | Higher latency due to connection setup for each request. |
| Efficiency | Efficient for real-time apps, as no connection setup overhead. | Less efficient for real-time due to connection setup. |
| Use Cases | Real-time chat, online gaming, live data updates. | Web pages, resource retrieval, and traditional apps. |
| Protocol | Uses WebSocket protocol (ws:// or wss://). | Uses HTTP/HTTPS protocol (http:// or https://). |
| Connection Types | Single connection serves multiple exchanges. | Multiple connections for each request-response cycle. |
Why WebSockets, and not HTTP?
As mentioned before, HTTP is the communication protocol that allows communication that transfers hypertext documents, such as web pages, over the internet. HTTP uses TCP protocol to establish a reliable connection between the client and the server.
HTTP is a request-response protocol, which means that the client must make a request to the server before the server can send a response. The downside of this is that it can introduce latency( the time it takes for data to travel from one point to another ).
Due to its inherent latency, HTTP is not the optimal protocol for applications that necessitate real-time communication. Consider a chat application, where relying on HTTP for instantaneous communication would not be viable.
So, what is the answer: WebSockets
How do WebSockets work?
Now that you are familiar with WebSockets, let’s see how it establishes the connection between the client and server in a client-server architecture.
The following diagram shows the steps involved in connecting the client and server via WebSockets.
  Client                                          Server
    |                                               |
    | 1. Initial HTTP Request                       |
    | ------------------------------------------->  |
    |                                               |
    | 2. HTTP Response (Upgrade to WebSocket)       |
    | <-------------------------------------------  |
    |                                               |
    | 3. WebSocket Connection Established           |
    |                                               |
    | 4. WebSocket Frames (Bi-directional)          |
    | <------------------------------------------>  |
    |                                               |
    | 5. Closing the WebSocket Connection           |
    | ------------------------------------------->  |
    |                                               |
    | 6. Acknowledgement                            |
    | <-------------------------------------------  |
    |                                               |
    |                                               |
Step 1 & 2: Initial HTTP Handshake:
- The client initiates the process by sending an HTTP request to the server, typically through a WebSocket URL( which starts with “ws://” or “wss://” prefixes).
- The request includes headers like
"Upgrade: websocket"and"Connection: Upgrade"to indicate that the client wants to upgrade the connection to WebSocket. - If the server supports WebSocket and agrees to the upgrade, it responds with an HTTP 101 status code (Switching Protocols) and includes headers like “Upgrade: websocket” and “Connection: Upgrade”.
Note: While it initially begins with an HTTP handshake, WebSocket operates independently of HTTP once the connection is established.
Step 3 & 4: WebSocket Connection Established, WebSocket Communication:
- After the server’s positive response, the connection is upgraded to the WebSocket protocol. The client and server can now communicate using WebSocket frames, which are designed for efficient and low-latency communication.
- Both the client and server can send WebSocket frames at any time, independently, without the need for explicit requests and responses.
- WebSocket frames can carry various types of data, including text, binary data, and control frames for things like ping-pong heartbeats and connection closing.
Step 5 & 6: Closing the Connection & Acknowledgement :
- Either the client or the server can initiate the closing of the WebSocket connection by sending a close frame.
- The other party acknowledges the close frame, and both sides proceed to close their respective connections.
Error Handling
If there are any issues with the connection, such as network problems or protocol violations, WebSocket provides error codes and mechanisms to handle and recover from these situations.
Implementing WebSockets with JavaScript
Websocket client
A WebSocket client is a software application that uses the WebSocket protocol to communicate with a WebSocket server.
When you develop an application that uses WebSockets, you need to use JavaScript’s WebSocket API. Most of the browsers today support this API. A browser that supports the WebSocket API functions as the WebSocket client in this case.
The main methods in the WebSocket API for creating, connecting, sending, and closing WebSockets are:
| Method | Description | Usage |
| WebSocket() | Creates a new WebSocket object. | const ws = new WebSocket(“ws://localhost:8080/”); |
| open() | Opens the WebSocket connection. | ws.open(); |
| send() | Sends a message to the WebSocket server. | ws.send(“Hello, world!”); |
| close() | Closes the WebSocket connection. | ws.close(); |
Note: In the table above, ws://localhost:8080/ is the URL of the server that the client wants to connect to. This URL should be the WebSocket server’s URL. The client uses this URL to establish a connection to the server. The WebSocket server listens for incoming connections at the URL provided.
In addition, the WebSocket API also provides other methods for managing WebSocket connections. Some of them are:
- onopen(): This event listener is called when the WebSocket connection is opened.
- onmessage(): This event listener is called when the WebSocket server sends a message.
- onerror(): This event listener is called when an error occurs with the WebSocket connection.
- onclose(): This event listener is called when the WebSocket connection is closed.
WebSocket server
A WebSocket server is a software application that implements the WebSocket protocol. It is responsible for handling incoming WebSocket connections, managing communication between clients and the server, and facilitating real-time, bidirectional data exchange.
As a developer, you do not need to create a WebSocket server from scratch. There are a lot of libraries out there that support the WebSocket protocol. Some of them are:
- Node.js: Libraries like ws or socket.io allow you to create WebSocket servers in JavaScript.
- Python: Libraries like WebSockets provide WebSocket server capabilities in Python.
- Java: The Java WebSocket API and third-party libraries can be used to build WebSocket servers in Java.
- Ruby: Libraries like websocket-ruby enable you to create WebSocket servers in Ruby.
Let’s develop your first WebSocket app
We will create a hands-on exercise to help you practice using the concepts you have learned.
Creating the WebSocket client
- Create a folder named it as
demo-websocket-app - Create a
client.htmlfile indemo-websocket-appfolder - Add the following code
client.html
<!DOCTYPE html>
<html lang="en">
<head>
    <meta charset="UTF-8">
    <meta name="viewport" content="width=device-width, initial-scale=1.0">
    <title>WebSocket Chat</title>
</head>
<body>
    <div id="chat">
        <input type="text" id="message" placeholder="Type your message">
        <button id="sendButton">Send</button>
        <div id="messages"></div>
    </div>
    <script>
        const socket = new WebSocket("ws://localhost:8080/chat"); // Replace with your WebSocket URL
        const messagesDiv = document.getElementById("messages");
        const messageInput = document.getElementById("message");
        const sendButton = document.getElementById("sendButton");

        socket.addEventListener("open", event => {
            console.log("WebSocket connection is open.");
        });

        socket.addEventListener("message", event => {
            const message = document.createElement("div");
            message.textContent = event.data;
            messagesDiv.appendChild(message);
        });

        socket.addEventListener("error", event => {
            console.error("WebSocket error:", event);
        });


        socket.addEventListener("close", event => {
            console.log("WebSocket connection is closed:", event);
        });


        sendButton.addEventListener("click", () => {
            const messageText = messageInput.value;
            socket.send(messageText);
            messageInput.value = "";
        });
    </script>
</body>
</html>
The event listeners( the first four highlighted ) in the above program are used to handle different events that can occur during the lifecycle of a WebSocket connection:
- “open” Event Listener: This event is triggered when the WebSocket connection is successfully established, and the connection is open and ready for communication.
- “message” Event Listener: This event is triggered when the WebSocket server sends a message to the client.
- “error” Event Listener: This event is triggered when an error occurs during the WebSocket connection, such as a network issue or a protocol error.
- “close” Event Listener: This event is triggered when the WebSocket connection is closed, either by the client or the server, intentionally or due to an error.
Creating the WebSocket server
We will create a WebSocket server with node.js. I assume you have installed the latest version of npm and node.js in your system.
- Open your terminal in
demo-websocket-app( the project folder ) created above - Run
npm initto initialize thenode.jsapplication - Install the
wslibrary: run npm install ws - Now, create a
server.jsin the project folder - Add the code below
server.js
const WebSocket = require('ws');
const http = require('http');

// Create a basic HTTP server
const server = http.createServer((req, res) => {
    res.writeHead(200, {'Content-Type': 'text/plain'});
    res.end('WebSocket Server\n');
});

// Create a WebSocket server by passing the HTTP server instance
const wss = new WebSocket.Server({ server });

// Set up the WebSocket connection event
wss.on('connection', (socket) => {
    console.log('A new client connected');

    // Set up the message event for the connected socket
    socket.on('message', (message) => {

        console.log(`Received: ${message}`);

        // Echo the message back to the client
        socket.send(`You sent: ${message}`);
    });

    // Set up the close event for the connected socket
    socket.on('close', () => {
        console.log('A client disconnected');
    });
});

// Start the HTTP server on port 8080
server.listen(8080, () => {
    console.log('Server is listening on port 8080');
});
Running the application
This demo application has both client and server side.
You can run the server program by running node server.js command on the terminal.
If you are in VS code, you can install an extension such as “Live Server” to run the client side of the application( client.html ).
After running both the client and the server, open the developer tools, go to the network tab, and then click on ‘WS’ to observe WebSocket connections. If you do not see any request URLs (such as ‘chat’ or ‘ws’), refresh the browser. Click on the ‘ws’ or ‘chat’ URL, and observe the status code: “101 Switching Protocols“.
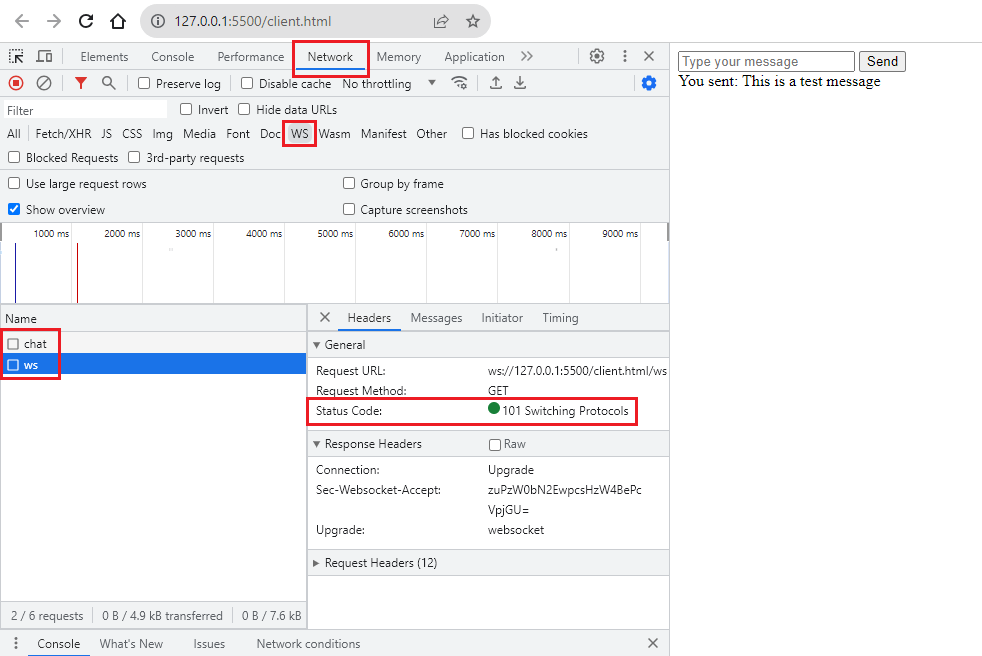
A “101 Switching Protocols” status code in the network tab indicates a successful upgrade from HTTP to the WebSocket protocol. This status code is part of the WebSocket handshake process, and it’s the expected outcome when you establish a WebSocket connection
Other technologies for real-time communication
In addition to WebSockets, there are alternative technologies like Server-Sent Events (SSE) and long polling designed for real-time communication over HTTP. These approaches address the constraints of traditional HTTP by either establishing persistent connections or employing efficient data streaming methods.
Server-Sent Events (SSE) allow the server to push data to the client over a single HTTP connection, making it suitable for scenarios where you want the server to continuously send updates to the client.
Long polling involves a client making an HTTP request to the server, and the server holds the request open until new data is available, at which point it responds. This approach can simulate real-time communication but involves repeated polling requests.
Last thoughts
In the ever-evolving landscape of web technology, WebSockets has emerged as the catalyst for real-time, interactive, and dynamic web applications. Their ability to establish persistent, bidirectional connections has revolutionized how we think about web development. From instant messaging to live data streaming, WebSockets empowers developers to create immersive and responsive user experiences. As we navigate the web’s future, embracing the power of WebSockets will undoubtedly continue to drive innovation and shape the way we connect and collaborate online.
