Table of Contents
Why Customize WooCommerce
Many e-commerce platforms wide variety of templates for customers. The availability of such a variety shows the importance of customization. These e-commerce platforms provide customization for specific needs by offering a large pool of templates often with drag-and-drop techniques to customize. However, these customization capabilities are limited, and this is where WooCommerce fills the gap in the e-commerce market. one of the greatest strengths of WooCommerce compared to other popular platforms such as Shopify is its capability for high customization according to the specific requirements of clients(the shop owner).
How to customize WooCommerce sites
There are mainly two ways to customize WooCommerce sites.
- Plugin – great for minor changes
- Child theme
Using a child theme for customization is the best way to do major customization. There are two ways to do it.
- Filters
- Templates
Based on my experience, I would suggest you use filters as much as you can. In this article, I am going to give you an introduction to customizing the WooCommerce Shop page with filters and some CSS code.
Creating a child theme
After you have installed and set up WooCommerce, take the following steps to create a child theme
Note: I assumed you already know how to install and set up WooCommerce. if you are not, please click here to learn
First, download the theme you need. I assume that you have downloaded the storefront theme.
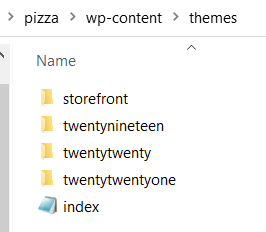
Inside the WordPress (You can have any name. Here, the name of my WordPress directory is pizza) directory, there is a wp-content directory. This is where all your themes are installed. Go to the theme folder. You can see the storefront theme along with other default WordPress themes.
Making storefront-child theme
- make a folder inside the themes folder and name it storefront-child
- now, open the storefront-child folder in your favorite text editor
- make a file named style.css in the storefront-child folder and add the following line to the file
Note: you can type your name as the Author
/*
Theme Name: Storefront Child
Version: 1.0
Description: Child theme for Storefront.
Author: Dinesh
Author URI: http://woocommerce.com
Template: storefront
*/
At this point, you have already created a child theme. But, you need one extra file to get styles from the parent theme. And that file is the functions.php file.
4. Now, inside the same folder create the functions.php file
Usually, this file needs to have code to enqueue the CSS code from the parent theme styles files. However, the Storefront theme does not need this PHP code because the parent Storefront theme does it for you.
But we need this file to add filters and any other PHP code that will customize the store for your needs.
Basic customization with CSS
You can add your CSS code in the syles.css file. This is easy if you know CSS and how to work with web developer tools in the browser.
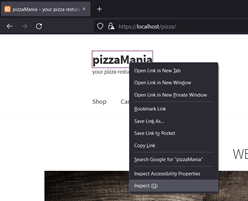
Changing the site title
Right-click and select inspect to see the code(HTML and CSS ) behind the site tile.
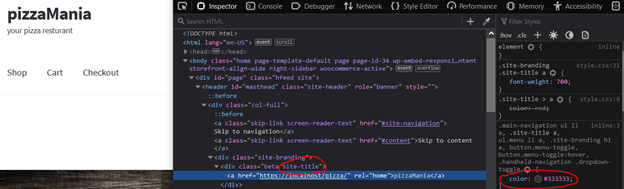
“pizzaMania” is an <a> element wrapped in a <div> element. As you may see that this DIV has two CSS classes: beta and site-title. beta could be a class that is used as a selector in other HTML elements. Therefore, take a more specific class. In this case, it is site-title. This way, we apply the customization only to the element we need and avoid applying styles to other elements. Therefore, the CSS selector for the site tile is .site-title>a. let’s make the following changes.
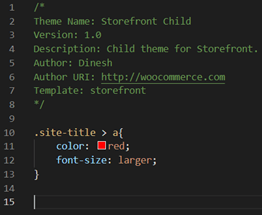
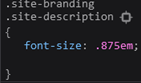
And let’s make font-size of site description to 1.37em.
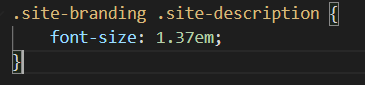
Note: storefront theme developers have used the .site-branding .site-description as the CSS selector. So, if you use .site-description alone to apply your CSS styles, it will not work as you expect because of the CSS specificity rule. You may override with “! important “. But avoid using “! important” as much as possible.

Likewise, you can customize your pages with CSS for your requirements.
More on customizing the shop page
Let us customize some of the features on the shop page with hooks(Actions and Filters).
Customize the WooCommerce Storefront theme breadcrumb

We are going to use a combination of filters and CSS classes to change the above breadcrumb in the storefront theme.
Change the home icon to a store icon
- Inspect the CSS class of the Home Icon with your browser’s developer tools
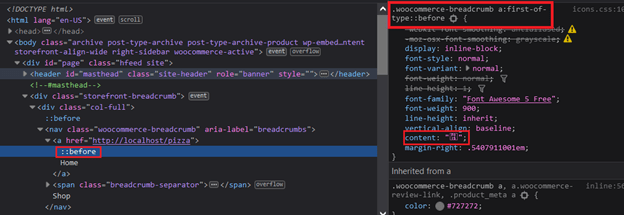
- Add the following CSS code in your style.css file.
.woocommerce-breadcrumb > a:first-of-type::before {
    content: "\f54e";
}
Note: storefront uses Font Awesome free icons. “\f54e” is the Unicode for store icon
learn how to use Font Awesome icons with CSS pseudo-elements
Change “Home” to “Main”(or any other name )
add_filter( 'woocommerce_breadcrumb_defaults', 'wcc_change_breadcrumb_home_text',20 );

function wcc_change_breadcrumb_home_text( $defaults ) {
    $defaults['home'] = 'Main';
    return $defaults;
}
Here to ‘20’ is the priority of execution. You need to have that with the storefront theme.
change the breadcrumb separator from ‘>’ to ‘/’
add_filter( 'woocommerce_breadcrumb_defaults', 'wcc_change_breadcrumb_delimiter',20 );
function wcc_change_breadcrumb_delimiter( $defaults ) {
    $defaults['delimiter'] = ' / ';
    return $defaults;
}
There is another way that I prefer. You can use one function(rather than two as above) to change the “home” text and the delimiter.
add_filter( 'woocommerce_breadcrumb_defaults', 'my_woocommerce_breadcrumbs',20);
function my_woocommerce_breadcrumbs() {
return array(
'delimiter' => ' / ',// or can use '/' instead of / , which is the HTML coded charater set
'wrap_before' => '<div class="storefront-breadcrumb"><div class="col-full">
<nav class="woocommerce-breadcrumb" itemprop="breadcrumb">',
'wrap_after' => '</nav></div></div>',
'before' => '',
'after' => '',
'home' => _x( 'Main', 'breadcrumb', 'woocommerce' ),
);
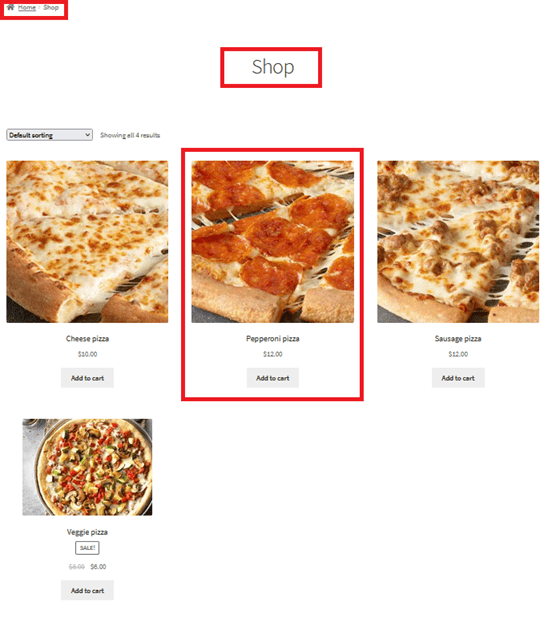
}After you customized the breadcrumb navigation should appear as follows.

More on Breadcrumb customization here
Changing the Title shop page
The WooCommerce shop page is a WordPress page that you can change by visiting the WordPress dashboard. You can use QUICK EDIT to change the title.

A developer may prefer changing the WooCommerce Shop page title with hooks.
add_filter( 'woocommerce_page_title', 'shop_page_title');
function shop_page_title() {
          return "Our Pizza Selection";
}
Customizing “Add Cart button”
you can use woocommerce_loop_add_to_cart_link filter to customize the “Add cart button”.
Ex:
If you replace the highlighted part of the code with “Add Pizza” the button text in the “Add cart” button will change
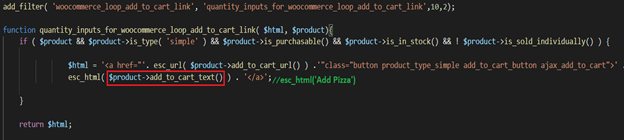
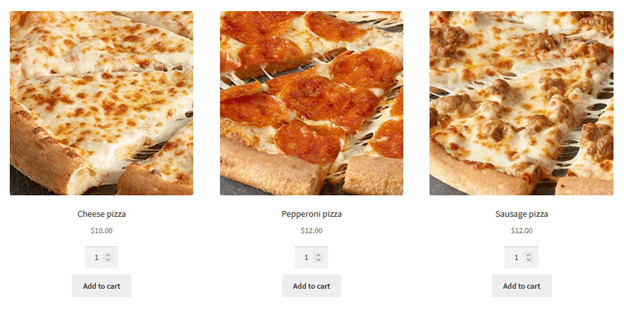
Adding an input quantity field
A common requirement you might have is to add an input quantity field on the shop page. We need to add a form to achieve this.
add_filter( 'woocommerce_loop_add_to_cart_link', 'quantity_inputs_for_woocommerce_loop_add_to_cart_link',10,2);

function quantity_inputs_for_woocommerce_loop_add_to_cart_link( $html, $product){
    if ( $product && $product->is_type( 'simple' ) && $product->is_purchasable() && $product->is_in_stock() && ! $product->is_sold_individually() ) {
           $html = '<form action="' . esc_url( $product->add_to_cart_url() ) . '"class="cart" method="post" enctype="multipart/form-data">';
           $html .= woocommerce_quantity_input( array(), $product, false );
           $html .= '<button type="submit" class="button custom-add-cart-button">' . esc_html( $product->add_to_cart_text() ) . '</button></form>';

    }

    return $html;

}
You can use custom-add-cart-button CSS class to add your own styles.
Customizing the Shop page default behavior
The default behavior of WooCommerce is to send the customer to a single product page when the customer clicks on the image of the product or product name. If you want to remove the link for the single product page and speed up the checkout process you can do this by adding the following code to the functions.php file.
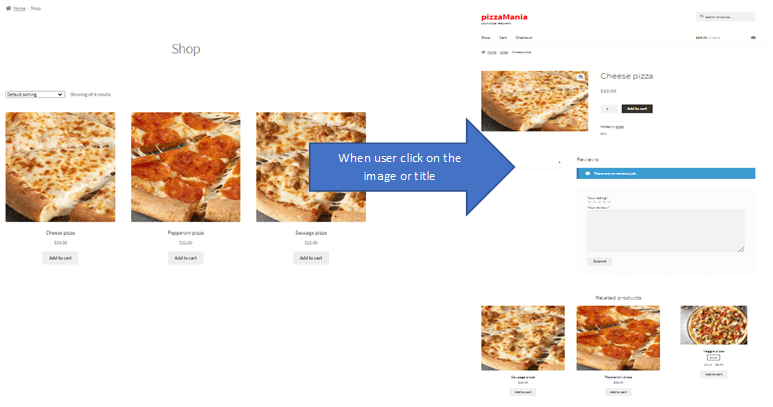
//remove the anchor tag in product image and product title.
remove_action(
    'woocommerce_before_shop_loop_item', 'woocommerce_template_loop_product_link_open',
    10
  );

//to remove anchor closing tag as well. Just to keep the best practices
remove_action(
    'woocommerce_after_shop_loop_item',  'woocommerce_template_loop_product_link_close',
    5
  );
However, if you go to the cart page you can still view the single product page. If you need to remove the anchor tags associated with product images and product names, you can add the following line to functions.php (Note that the single product page can still appear as a result of a search on the site.)
// It will remove the product links from your cart page.
add_filter('woocommerce_cart_item_permalink','__return_false');
Conclusion
The main strength of WooCommerce as an e-commerce platform is its ability to customize based on user requirements. Therefore, WooCommerce is great for building the ultimate e-commerce site for your clients. WooCommerce recommends using hooks( Filters and Actions) to customize existing e-commerce themes according to the customer’s needs. While I focus on customizing the shop page of WooCommerce in this post, I will be bringing information on customizing other default WooCommerce pages in future posts.